WordPress Plugin
Our plugin for WordPress supports the following features:
- PredictiveAddress
- Phone Validation
- Email Validation
- Unusable Name Validation
- Bank Validation (Not supported for WooCommerce)
WordPress Plugin Compatibility
Our WordPress plugin integrates with Contact Form 7, Gravity Forms, WPForms, Elementor Pro or WooCommerce forms to apply real-time validation to your forms.
The following versions have been tested for compatibility:
| WordPress | PHP | Contact Form 7 | WooCommerce | Gravity Forms | WPForms | Elementor Pro |
|---|---|---|---|---|---|---|
| 4.5 | 5.6.24 | 4.6.1 | 2.2.3 | 2.4.6.12 | - | - |
| 4.6.1 | 5.6.28 | 4.6.1 | 2.2.3 | 2.4.6.12 | - | - |
| 4.8 | 5.6.32 | 5.1.1 | 3.5.6 | 2.4.6.12 | - | - |
| 4.9.8 | 7.2.12 | 5.1.1 | 3.5.6 | 2.4.6.12 | - | - |
| 5.0 | 7.2.15 | 5.1.1 | 3.5.6 | 2.4.6.12 | - | - |
| 5.1 | 7.2.15 | 5.1.1 | 3.5.6 | 2.4.6.12 | - | - |
| 5.1.1 | 7.2.16 | 5.1.1 | 3.5.6 | 2.4.6.12 | - | - |
| 5.2 | 7.2.16 | 5.1.1 | 3.5.6 | 2.4.6.12 | - | - |
| 5.2.1 | 7.3.6 | 5.1.3 | 3.5.6 | 2.4.6.12 | - | - |
| 5.2.2 | 7.3.6 | 5.1.3 | 3.5.6 | 2.4.6.12 | - | - |
| 5.2.3 | 7.3.6 | 5.1.3 | 3.7.0 | 2.4.6.12 | - | - |
| 5.2.4 | 7.3.10 | 5.1.4 | 3.7.1 | 2.4.6.12 | - | - |
| 5.3 | 7.3.10 | 5.1.4 | 3.7.1 | 2.4.6.12 | - | - |
| 5.3.1 | 7.3.10 | 5.1.6 | 3.8.1 | 2.4.6.12 | - | - |
| 5.3.2 | 7.3.13 | 5.1.6 | 3.8.1 | 2.4.6.12 | - | - |
| 5.4.1 | 7.3.13 | 5.1.9 | 4.3.0 | 2.4.6.12 | - | - |
| 5.5.1 | 7.3.13 | 5.2.2 | 4.3.0 | 2.4.6.12 | - | - |
| 5.6 | 8.0 | 5.3.2 | 4.8.0 | 2.5- beta-3 | - | - |
| 5.7.2 | 7.4.19 | 5.4.1 | 5.3.0 | 2.5.5 | - | - |
| 5.8 beta rc2 | 7.4.21 | 5.4.1 | 5.3.0 | 2.5.6.1 | - | - |
| 5.9 | 7.4.27 | 5.4.4 | 6.1.1 | 2.5.16.1 | 1.7.2 | - |
| 5.9.1 | 7.4.27 | 5.5.6 | 6.3.0 | 2.5.16.1 | 1.7.2.2 | 3.6.3 |
| 6.0 | 7.4.27 | 5.5.6 | 6.5.1 | 2.6.3 | 1.7.4.1 | 3.6.4 |
| 6.2 | 7.4.30 | 5.7.5.1 | 7.5.1 | 2.7.3 | 1.8.1.1 | 3.12.1 |
Installation
To install the Data8 WordPress plugin, log in to the admin area of your WordPress site (/wp-admin). From the left side menu select 'Plugins', and then at the top of the new screen, 'Add New'. Find the Data8 Validation plugin from the WordPress marketplace. Follow the installation wizard ('Install Now' button) to get the plugin installed on your site.
On the plugins page of the admin area, you should now see the Data8 Validation plugin. From here you can activate and then configure the settings to suit your individual needs.
Should you ever wish to uninstall the Data8 WordPress Plugin, either 'De-activate' (for temporary removal), or 'Delete' it from the 'Plugins' page on the admin area of your site.
Configuration
From the Data8 settings page (accessed from the left side menu of the admin area of your site) you can enable and choose the validation options that suit your needs.
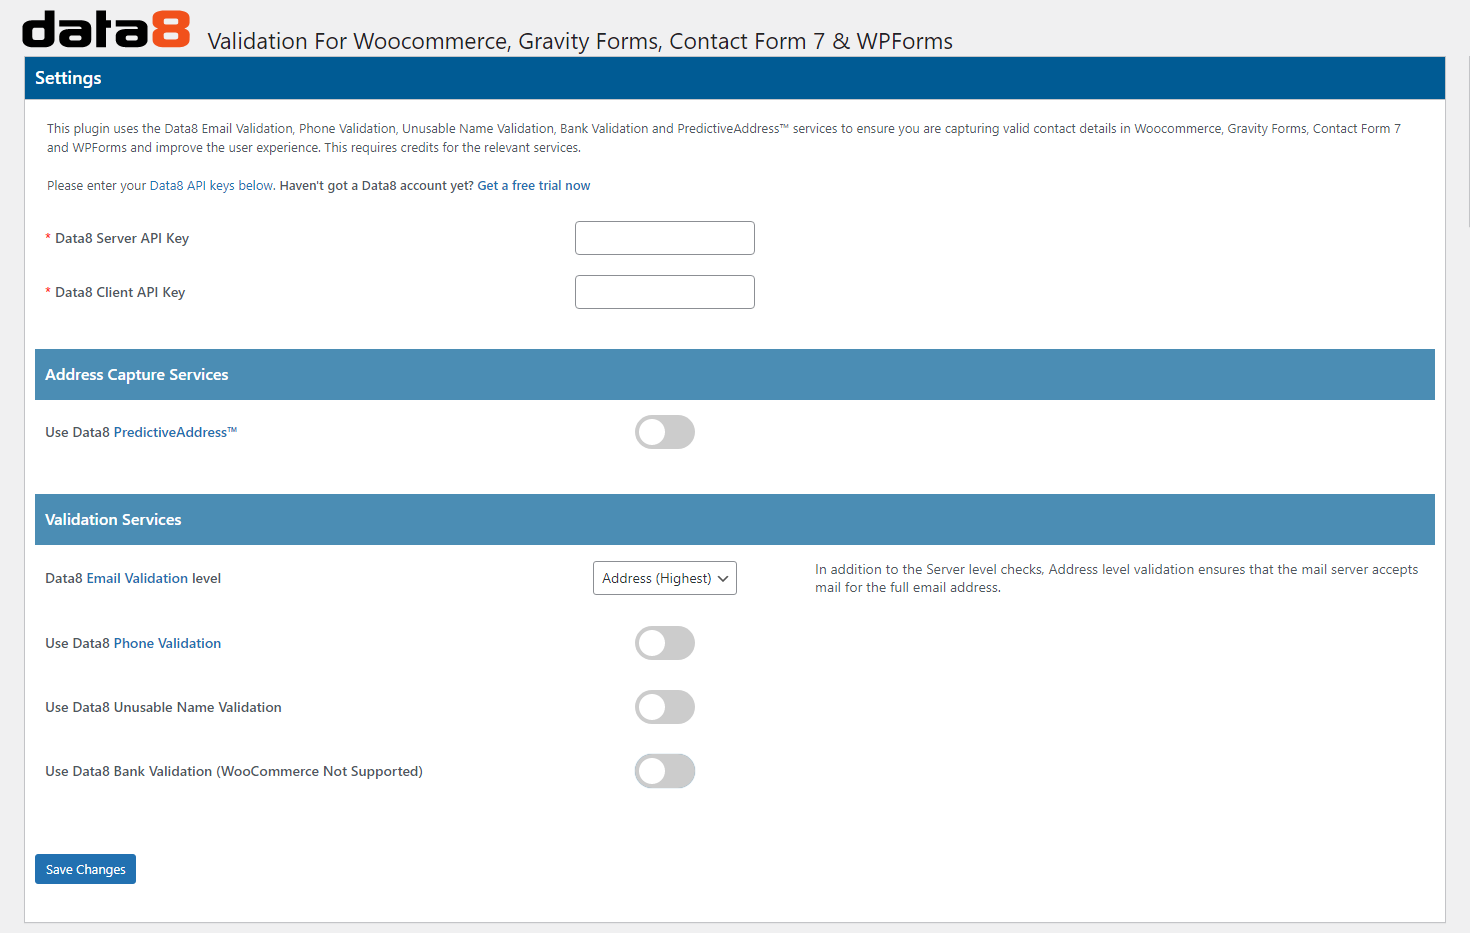
On the configuration screen, enter your server and client-side API keys generated from the Data8 Dashboard. Each validation service requires the necessary credits to function.
PredictiveAddress Options
When the PredictiveAddress service is enabled, the PredictiveAddress Options box will become visible. This box can be left blank to use the default configuration of PredictiveAddress. However, should you wish to customise your integration, you can do so by entering any combination of the options available for the PredictiveAddress service.
For example, enter the following into the PredictiveAddress options box to detect the initial country in the PredictiveAddress search, from the users IP address:
initialCountry: auto
PredictiveAddress ///what3words integration
You can search for any 3 word address by simply typing out the three words like so "pitch.tells.civil".
If you wish to store the 3 word address that was used to retrieve the final address, add the class data8_what3words to an input field to indicate where we should store the what3words address.
includeLocation: true
includeWhat3Words: true
and then add the classes: data8_latitude and data8_longitude to some text inputs to indicate where to store the returned data.
Telephone Validation Options
When Telephone Validation is enabled, all suitable telephone number fields are validated automatically. There are also some other options available to you for further control of validation: Default Country Code, Required Country, Allowed Prefixes, Barred Prefixes.
| Option | Description |
|---|---|
| Default Country Code | The ISO 2-character country code or international dialling code of the country to validate the telephone number in, unless that number contains an explicit country code prefix. |
| Required Country | Indicates the country that the number must be in to be considered valid. This should be provided as the ISO 2-character country code. |
| Allowed Prefixes | A comma-separated list of prefixes in standard international format that the number must start with to be treated as valid. For example, use "+441,+442" to allow only standard UK landline numbers. |
| Barred Prefixes | A comma-separated list of prefixes in standard international format that will cause the number to be treated as invalid. For example, use "+90,+447781" to block any Indian numbers or numbers allocated to C&W Guernsey. |
For example, enter the following into the Phone Validation options box to invalidate any unlikely numbers even if they are technically valid, such as 07000000000:
ExcludeUnlikelyNumbers: true
Email Validation Levels:
When Email Validation is enabled, all suitable email address fields are validated automatically. The level of validation to apply to entered email addresses can be selected from a drop down on the settings page. See the table below for information on each level.
| Level | Description |
|---|---|
| Syntax | The supplied email is checked to ensure that it meets the standard email address format. This is the quickest option and would reject such incorrect email addresses as "noone@nowhere" and "N/A", but would accept incorrect email addresses that are correctly formed but that do not include a valid domain name such as "noone@data-9.com". |
| Domain | The supplied email is checked to ensure that the domain name (the part to the right of the @ sign) exists and is set up to receive email. This is still normally very quick, but can take a few seconds in some cases. This check would reject incorrectly formatted email addresses in the same way as the Syntax check, and would also reject a misspelled domain name such as "noone@data-9.com". It can also detect when a domain name exists but does not handle email, such as "noone@example.com". It does not verify that the part of the email address to the left of the @ sign exists. |
| Server | In addition to the Domain level checks, validates that at least one of the mail servers advertised for the domain is actually live. |
| Address | In addition to the Server level checks, validates that the mail server accepts mail for the full email address. |
Usage
After entering your configuration details and clicking save, the relevant enhanced data capture and validation will be applied to various data entry points around your site, assuming they are set up correctly following the attachment instructions on the configuration page.
For instructions on setting up the fields for each service, please refer to the section appropriate for the form builder plugin you are using on your site i.e. Contact Form 7, Gravity Forms, WPForms, Elementor Pro or WooCommerce.
PredictiveAddress
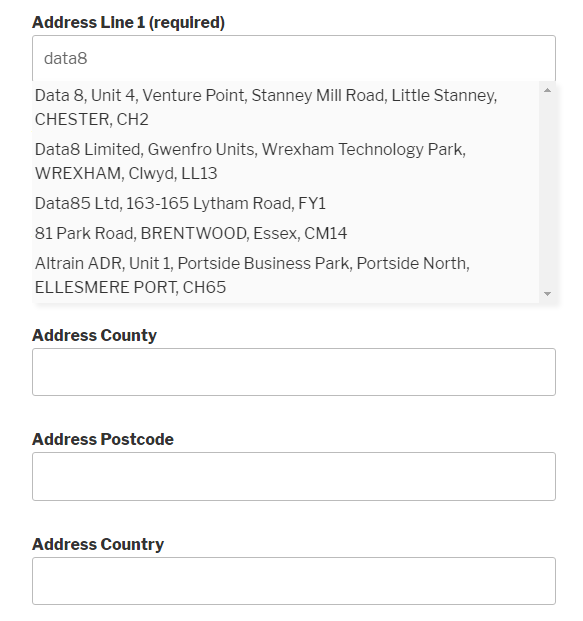
When PredictiveAddress is enabled, any suitable address entry section on your forms will have use of our address autocomplete and verification tool. Simply begin typing an address/postcode/company name into the Address line 1 box to start searching and narrowing down results.
Validation
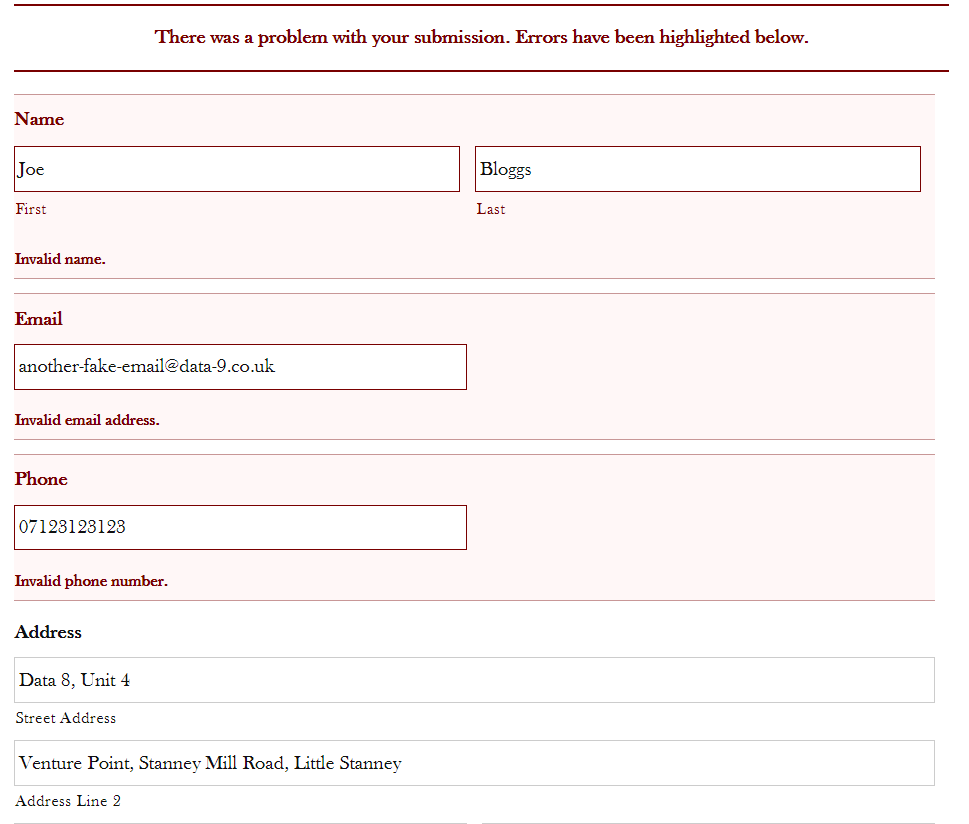
If entered data is identified as invalid, the error will be highlighted suitably on the form.