Skip to the content

Step 1: Modify the embed code to use the built-in callback function

If you haven't already, get your form embed code from Marketo from the Form Actions drop down.

The default embed form code looks something like this:

<script src="//go.your-domain.co.uk/js/forms2/js/forms2.min.js"></script>
<form id="mktoForm_1001"></form>
<script>MktoForms2.loadForm("//go.your-domain.co.uk", "XXX-XXX-XXX", 1001);</script>

To implement the callback function, this code should be changed like so:

<script src="//go.your-domain.co.uk/js/forms2/js/forms2.min.js"></script>
<form id="mktoForm_1001"></form>
<script>MktoForms2.loadForm("//go.your-domain.co.uk", "XXX-XXX-XXX", 1001, function(form){
  // insert Data8 code here
});
</script>

jQuery is required for our integration to work! If you aren't sure how to add it to your page, the following will work:

<script type="text/javascript" src="https://code.jquery.com/jquery-1.12.4.min.js"></script>

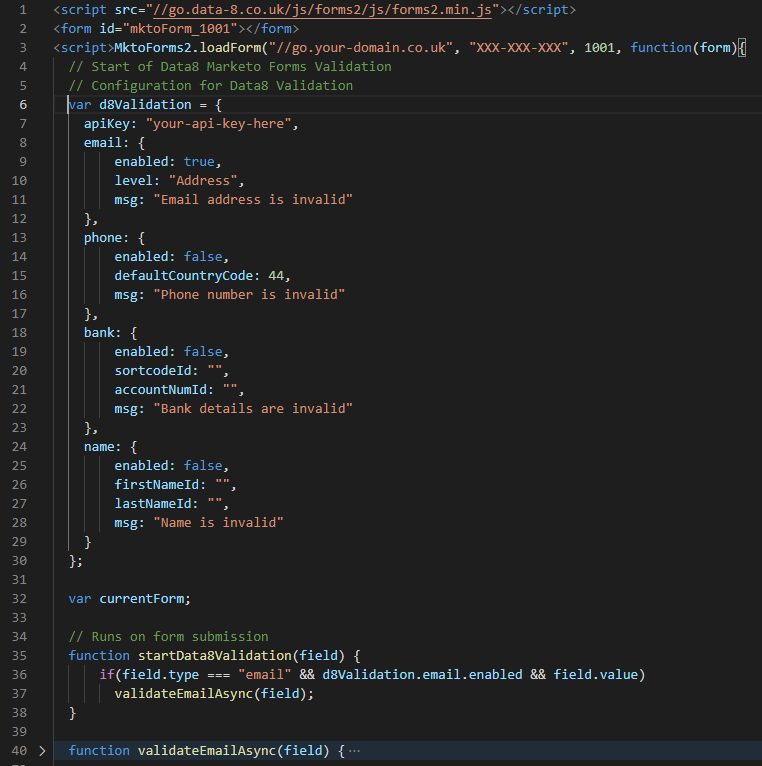
Step 2: Generate your configuration code using the form below

Simply fill out the form and click generate to get your custom code.

Each validation service requires the necessary credits to function.

An API key is required to use any of the validation or PredictiveAddress services. You can generate one from the Dashboard, under the Validation tab or by clicking here

Client API Key
Use PredictiveAddress
Include Multiple Residency Properties (Requires additional licensing)
Include addresses from the UK Multiple Residency database, e.g. multiple flats behind a single letter box, university halls of residence
Include Not Yet Built Properties (Requires additional licensing)
Include addresses from the UK Not Yet Built database, e.g. houses currently being developed
Use Geocoding (Retrieve latitude and longitude information)
Include location information (latitude/longitude, easting/northing and/or grid reference, depending on country) where possible
Use what3words to get Geolocation (Requires additional licensing)
Indicate if the coordinates of the what3words searched for by the user should be included in the response instead of the standard coordinates available for the address. This option consumes a what3words credit in addition to the standard PredictiveAddress credit.
Allowed Countries
An array of ISO2 country codes that the user is allowed to select from, e.g. [ "GB", "US" ] to limit the user to UK and US addresses. Leave this set to null to allow the user to select from all the supported countries
Barred Countries
An array of ISO2 country codes that the user is not allowed to select from, e.g. [ "RU", "CN" ] to allow the user to select any country other than Russia or China. Leave this set to null to not block any countries
Use Email Validation
Email Validation Level
In addition to the Server level checks, validates that the mail server accepts mail for the full email address.
Email Validation Message
Use Phone Validation
Default Country Code
Specify the ISO 2-character country code or international dialling code of the country to validate the telephone number in, unless that number contains an explicit country code prefix. i.e. 'GB' or '44'
Phone Validation Message
Use Bank Validation
Sortcode Field ID
The ID of the sortcode field on your form
Account Number Field ID
The ID of the bank account number field on your form
Bank Validation Message
Use Name Validation
First Name Field ID
The ID of the first name field on your form
Last Name Field ID
The ID of the last name field on your form
Name Validation Message

Step 3: Paste code

Having generated your code above, you can now copy and paste this into your form embed code that we prepared in step 1.

You should insert the code into your callback function, replacing the // insert Data8 code hereline with the generated code.

Please note that if you are using the PredictiveAddress service you will need to replace the field id's (address1, address2 etc) with your address field id's. For help on how to do this, see the 'Advanced Configuration' section below.

Should you ever wish to remove the Data8 Validation or PredictiveAddress from your form, simply remove the generated code from your form embed code.

That's it! Data8 Validation and Address Capture has been applied to your form, depending on the options you selected.

Advanced Configuration

For most integrations, the setup steps above should be enough to get your integration working. However, if you are using PredictiveAddress, you will need to perform some additional customisations to get your integration up and running.

Code Breakdown

Lets break down the default PredictiveAddress code shown below.

// Start of Data8 Marketo Forms PredictiveAddress
  MktoForms2.onFormRender(function (form) {
    var txt = document.getElementById('address1');
    if(txt && !txt.classList.contains("data8-PA-has-attached")){              
      txt.classList.add("data8-PA-has-attached");
      new data8.predictiveaddressui(txt, {
        ajaxKey: "your-api-key-here",
        fields: [
          { element: 'address1', field: 'line1' },
          { element: 'address2', field: 'line2' },
          { element: 'address3', field: 'line3' },
          { element: 'city', field: 'town' },
          { element: 'county', field: 'county' },
          { element: 'country', field: 'country' },
          { element: 'postcode', field: 'postcode' }
        ]
      });
    }
  });
// End of Data8 Marketo Forms PredictiveAddress

The code starts on Line 2 where we attach the custom code to the built-in method that is called when the form is loaded.

Line 3 identifies the field on your form to use as the input field. By default it looks for a field with the id address1. This will need to be replaced to suit the input field on your form (usually the line 1 of your address fields).

Lines 4 and 5 ensure the initialisation code is only ran once.

On Line 6 we create a new instance of the PredictiveAddress tool, passing in a first parameter of the input field, and a second parameter which is an object containing the configuration settings.

Line 7 is the API key used to authenticate your requests. This will already be populated by the code generator.

Lines 8 - 16 are field mappings which are used to tell our service where to put the returned address data. For each row (object) in the array, the value of the 'element' property is the id of the field on your form, and the 'field' property tells our service which part of the returned address data to place in that field. For example, Line 9 tells our service to put the first line of the returned address into the field with id address1. Lines 9 to 15 will need modifying to suit your form.

The remaining lines of code specify the end of the configuration settings, objects and methods.

Required Configuration Changes

For the PredictiveAddress service to work correctly, you will need to replace the id's in Line 3, and Lines 9 - 15 with id's from the fields on your form. Therefore you would replace address1 on Line 3 and Line 9 with your field id e.g. 'BillingStreet'.

Not all of the mappings are required for the service to work and some lines can be removed from the configuration to suit your needs. The only required mappings are 'line1', and 'postcode'. Therefore, for a minimal integration, you could remove Lines 10, 11, 12, 13 and 14. This would put all of the returned address data into the 'line1' field except for the postcode, which would be placed in the 'postcode' field.

fields: [
  { element: 'BillingStreet', field: 'line1' },
  { element: 'BillingPostcode', field: 'postcode' }
]

Advanced Configuration Options

Telephone Validation

When Telephone Validation is enabled, all suitable telephone number fields are validated automatically (input fields of type 'tel'). The Default Country Code option is the ISO 2-character country code or international dialling code of the country to validate the telephone number in, unless that number contains an explicit country code prefix. If entered data is identified as invalid, the error will be highlighted suitably on the form.

Email Validation

When Email Validation is enabled, all suitable email address fields (input fields of type 'email') are validated automatically. The level of validation to apply to entered email addresses, along with the custom error message to display, can be configured in the settings. See the table below for information on each level. If entered data is identified as invalid, the error will be highlighted suitably on the form.

Email Validation Levels:

Level Description
Syntax The supplied email is checked to ensure that it meets the standard email address format. This is the quickest option and would reject such incorrect email addresses as "noone@nowhere" and "N/A", but would accept incorrect email addresses that are correctly formed but that do not include a valid domain name such as "noone@data-9.com".
Domain The supplied email is checked to ensure that the domain name (the part to the right of the @ sign) exists and is set up to receive email. This is still normally very quick, but can take a few seconds in some cases. This check would reject incorrectly formatted email addresses in the same way as the Syntax check, and would also reject a misspelled domain name such as "noone@data-9.com". It can also detect when a domain name exists but does not handle email, such as "noone@example.com". It does not verify that the part of the email address to the left of the @ sign exists.
Server In addition to the Domain level checks, validates that at least one of the mail servers advertised for the domain is actually live.
Address In addition to the Server level checks, validates that the mail server accepts mail for the full email address.