Custom Control
Once you have created your mappings in the configuration guide, the next stage is to add a custom control to the form to track and display your validation status. This control should be placed directly on the email address or the phone number field on a model driven app form.

Due to the advanced configuration of the custom control, the maker portal cannot currently be used to assign the control to the form field which means you will need to switch to classic.

Once you are in the classic interface, select your field and apply the “Data8 Validation Indicator” control.

The options for the control are as follows:
Status Field: Required. This should be bound to the status field specified in the configuration page.
Date Field: Required. This should be bound to the date field specified in the configuration page.
First Name Field: Optional – emails only. This should be bound to the first name field on the record.
Last Name Field: Optional – emails only. This should be bound to the last name field on the record.
Company Name Field: Optional – emails only. This should be bound to the company name field on the record.
Validation Result: Disregard. This is an output property only which you do not need to configure.
Extend with Javascript
By design, a custom control is applied to a field meaning it will only have context to itself and not the wider form. We do offer the option to extend any results and warnings to the form using some JavaScript.

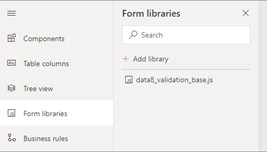
To set this up, select “Form Libraries” on the left-hand side and add the “data8_validation_base.js” library to your form.
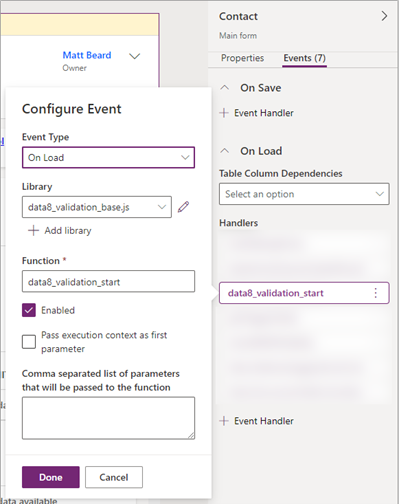
Once this is added, add an event handler to the “On Load” event of your form called data8_validation_start, ensuring the execution context is passed as the first parameter.
Setting the Error Level
The Javascript option allows some additional configuration. Within the configuration page of the “Data8 Validation Configuration” app you can specify behaviour experienced when an invalid piece of data is input. By both telephone and email, you will see a dropdown box:
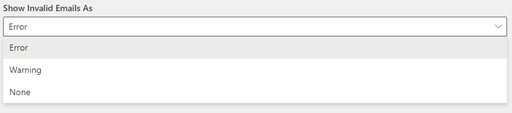
Error:
Error will prevent the saving of the form and give an alert next to the invalid field, as well as on the top of the form on save.

Warning:
Warning will give an alert at the top of the page of any invalid data. This will not prevent the user saving.

None:
There will be no prompt on the screen, however the fields that store the valid status will still be automatically updated.
Overriding on a Form by Form basis
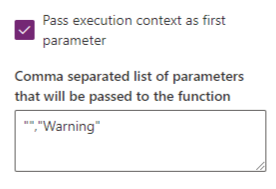
The options above as for a global set up and each table using the validation will adhere to that configuration, however you can override this on forms during the event handler set up.
The overrides are always specified as “Telephone Override”, “Email Override”. If you only want to override one type, leave the other one blank so for example, the following image will leave Telephone as its global setting but override Email on this form to be “Warning” instead.