When creating a new dedupe+, the following options are available.
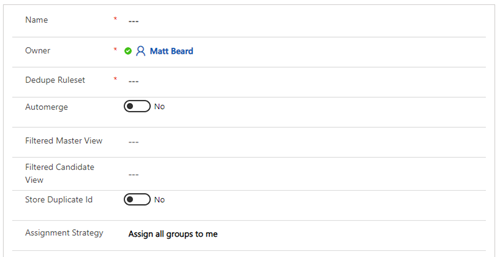
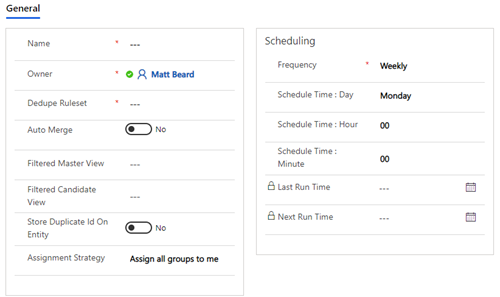
Name:
This is a friendly name for your reference only.
Owner:
This is the owner of the job, again for your reference only.
Dedupe Ruleset:
This is a lookup to the rule set you would like to run against the data.
Automerge:
This is a yes/no option where you can enable the results to be automatically merged. This defaults to “No” and should only be set to “Yes” once you are fully happy with your Dedupe+ and Merge+ rules. If you are running a job with Automerge enabled, we would always recommend creating a back up before as we will not be able to revert our changes.
Run Merge Async: (Online Only)
This option will allow an automerge job to run all it’s merges asynchronously as system jobs. Your job complete much quicker and the merges will continue to run behind the scenes. Note – you not be alerted to any failed merges.
Filtered Master View:
Duplicare defines a master as the pot in which duplicates will be looked for. This enables you to reduce that pot so you will only look for duplicates within a subset – for example you only want to find duplicates within your “Active Contacts”. The drop-down box for Filtered Master View is populated by both system views and your user views. If left blank, it will use all rows.
Filtered Candidate View:
Duplicare defines a candidate as the pot of rows which we would like to see is duplicates. This enables you to reduce that pot – for example find duplicates of “Leads created on last 24 hours”. The drop-down box for Filtered Candidate View is populated by both system views and your user views. . If left blank, it will use all rows.
Store Duplicate ID:
This is optional and defaults to “No”. If you select “Yes”, the results of the dedupe+ will populate the column you select in the “Store Duplicate ID Override Field” column, enabling to you to perform analysis in a data tool of your choice. Setting this to “Yes” will slow the job down as duplicare will have to apply an update to all affected rows – it will also affect the modifiedon values of those rows.
Store Duplicate ID Override Field:
By default, the duplicate ID will be stored in the “Duplicate Detected ID” column however you can change this option by selecting it here.
Assignment Strategy:
Once the Dedupe+ Job is complete and groups of duplicates have been identified, one or more people will need to work through those groups to merge the rows. If you have many duplicates and need to split this work across multiple people, use this setting to have the groups automatically assigned to the relevant users for review. If you select “Assign groups across a team” then another option will appear.
Assignment Team:
This will only appear if you have selected “Assign groups across a team” and it allows you to select the team in charge of handling the duplicate groups.
Once you press save, it will save the row with a default status reason of “Pending”. It can take out system up to 5 minutes to pick up the job and you will know we have picked it up as the status will have updated to “Processing”.
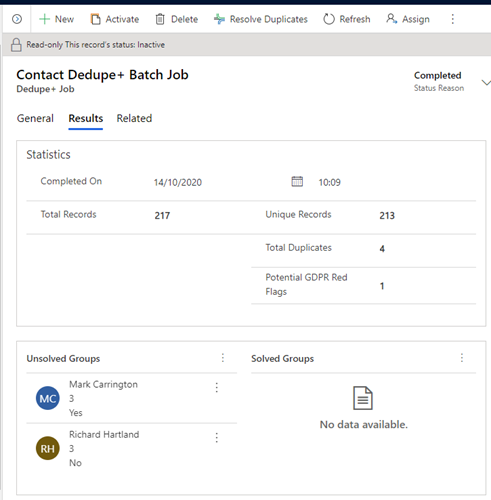
Processing the results
Once the job is complete, the status will change to “Completed” and if you open the Dedupe+ job row, you will now see a new “Results” tab is visible.