Home » Resources » How-to Guides » Dataverse & Dynamics 365 Installation Guide » Duplicare Hub » Duplicare Installation Guide » Merging Records
Duplicare: Merging Records
Creating a Merge+ Rule
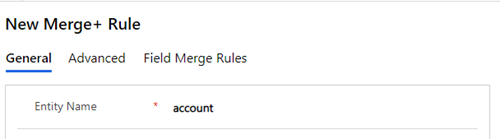
Data8 Duplicare™ enhances the standard merging records functionality with its own Merge+ Rules. Navigate to Merge+ Rules on the main sitemap and click the “New” button to create a new rule.
Enter the table logical name into the “Entity Name” column. Start to enter the name and an auto-complete pop-up with the available options that match the entered characters will show. Select the correct table from the list.
Save the row. This may take some time as several customizations will be made automatically to the selected table type to enable merging.
Field Merge Rules
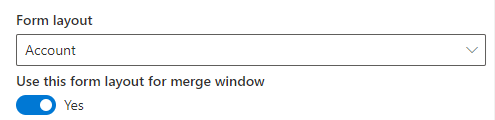
The layout that is used is the same as the layout that was applied the last time the chosen table was viewed. Any that are not on the layout will be grouped together in the “Additional Fields” section at the bottom.
If you wish to specify a layout to always be used for the merging layout, that can be done by selecting the option “Use this form for all users”.
Each column can have any number of merge rules applied to it. If none is applied, the value of the column is left unchanged from the master row. To apply a Merge Rule to a column click the column and modify the “MERGE RULES” in the right side of the window.
Pinned Fields
The merge window offers the option to have pinned fields at the top of the screen. Users can pin their own fields on a use case basis, or you can enforce system level pins through this merge+ window.

Selecting a field, there is a check box to enable a field for merge window pinning.
The following merge rule types are available (some are only applicable to specific types of columns):
A value (by default, the value from the selected column) is taken from the first row in the list. A different source column can be selected if required.
The set of rows being merged is analysed to identify the most common value from the specified source column. By default, the source column will be the same as the selected target column but can be changed if necessary.
An optional filter can be applied to the set of rows being merged, e.g. to exclude blank values. In this case, only those rows matching this filter are analysed.
If there are two or more different values with the same number of occurrences, you can choose to continue to the next rule or to pick an arbitrary winner. If continuing to the next rule, only those rows that are part of the potential winning values are passed as candidate rows to the next rule.
This rule only applies to text columns. The set of rows being merged is analysed to identify the most common values across multiple columns (e.g. Email Address 1, Email Address 2 and Email Address 3). Any blank values are automatically excluded. The Priority setting then identifies which of the values to take, e.g. “1” indicates to take the most common value, “2” to take the second most common etc. When different values occur the same number of times, an arbitrary ordering is applied between them.
This rule only applies to text columns. The value is taken from the specified source column from each row being merged and then concatenated together into a single value. Optionally ensures each value is included only once, where multiple rows have the same value, excludes blank values and can use different separators.
Takes the set of rows being merged, optionally applies a filter to it to exclude specific rows and then sorts the result. The value is then taken from the specified source column from the row that is first in that sorted list. If two or more rows have the same sort order you can choose whether to pick one arbitrarily or continue to the next rule. If continuing to the next rule, only those rows that are at the top of the sorted list are passed on to the next rule.
This rule only applies to numeric or money columns. The value is calculated by adding up the value from each row being merged. This is currency aware, so £100 + $150 with an exchange rate of £1 = $1.50 will result in £200 or $300 depending on the currency of the merged row, not £250 or $250.
This rule only applies to multi select picklist columns. The value will be a list of all values combined.
This rule only applies to multi select picklist columns. The value will be a list of values that are selected across all rows.
Advanced Settings
Merged Status Reason:
This specifies the status reason for the rows that are NOT picked as the master row for tables that do not have “merged” by default. In this box, enter the option set value for the Status Reason column (statuscode) for the specified table.
This is optional and if not specified the “default” value for the “Inactive” status reason is used.
Master Selection Rule:
An “order by” clause that uses our “Expression & Sorts” and is used to specify the order that the rows are sorted to pick out the Master Record (top record after the sort has been applied).
This is optional and if not specified the “default” master record will be set to the earliest created record.
Show Other Fields:
By default the merge+ screen will display all columns on the form, following by all other columns in an “Others” section at the bottom. If this “Others” section is not required, it can be disabled here.
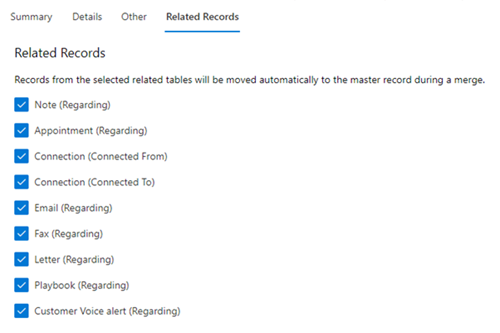
Related Records
Tables that can be merged out of the box (account, case, contact & lead) will use the standard “Merge” request upon a merge completion meaning reparenting of related records will behave as it always did.
Other tables have a custom merge action that will run that will, by default, reparent all related child records. There may be situations where a related does not want to be reparented and duplicare allows you to configure this. Under the header “Related Records”, a list of all relationships will be listed – here you can unselect relationships as required.
Example Pipeline
The merge process can be thought of as a pipeline, with the set of rows to be merged being passed from one rule to the next until a rule produces a value. The set of rows may be filtered or reordered in each step, which can affect how the next step operates. The following example attempts to demonstrate how this works:
The following records are selected for merging:
# | Created On | Full Name | Email Address 1 | Do Not Email |
1 | 2017-01-01 | Joe Bloggs | True | |
2 | 2017-02-02 | Jo Bloggs | False | |
3 | 2017-03-03 | Joe Blogs | False | |
4 | 2017-04-04 | Jo Blogs | False | |
5 | 2017-05-05 | Joe Bloggs | False | |
6 | 2017-06-06 | Jo Blogs | False |
We want to take the best email address from this set of records. The master selection rule is set to “createdon” to prefer the oldest record, so the records will start in the pipeline in the above order.
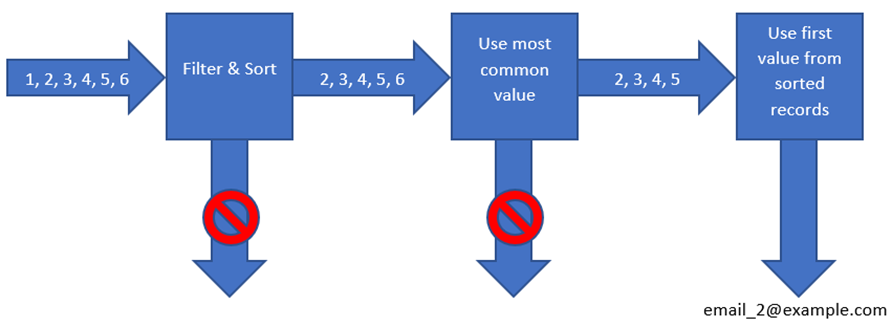
Filter & Sort is configured with Filter: donotemail = false. This will filter out record #1. As there are still 5 records left that it cannot distinguish between it does not return a value but passes those 5 records on to the next stage in the pipeline.
Use most common value will now look for the most common email address. Although [email protected] occurs 3 times and [email protected] only twice in the original set of records, record #1 has been filtered out, so there is a draw. Record #6 is eliminated as [email protected] only occurs once. Records #2, #3, #4 and #5 are passed on to the next step (preserving the sort order from the previous step).
Use first value from sorted records will now simply take the value from the first record, i.e. record #2.
NOTE: The “Use Master” and “Use first value from sorted records” rules are the same rule, but in different contexts. When used as the first rule in the pipeline, the first record will always be the master record, but in subsequent steps the records could have been re-ordered. If you move this rule up or down the pipeline you’ll notice it change name, but the effect is the same.
Expressions and Sorts
Expressions & Sort use a language called Expressions. This should be familiar to administrators who are used to SQL or CRM’s own calculated columns.
Each expression can reference any of the columns in the rows being merged by their logical names.
Common operators can be applied to the values, such as + – < > = !=. Literal numeric and string values can be used, with strings enclosed in single quotes.
Filters are a single expression that result in a Boolean (true or false) value. This is typically done with a comparison operator such as < > = != is is not, e.g. emailaddress1 is not null. These can also be combined with and and or.
Each sort is composed of an expression and a direction, ASC or DESC. Multiple sorts can be combined with commas, e.g. emailaddress1 ASC, createdon DESC. The direction can be omitted, in which case it is assumed to be ASC.
When you enter a sort or expression and leave the column it is validated, and any validation errors are highlighted in red and must be corrected before saving the changes.
| Expression Type | Example Expression | Description |
| Sort | createdon DESC | Sort records in created date order, preferring the most recent record |
| Sort | createdon ASC | Sort records in created date order, preferring the oldest record |
| Sort | CASE WHEN emailaddress IS NULL THEN 0 ELSE 1 END DESC | Prefer records with an email address over those without an email address |
| Sort | CASE WHEN emailaddress IS NULL THEN 0 ELSE 1 END DESC, cdi_score DESC | Prefer records with an email address, then use the score from ClickDimensions as a tie-breaker. |
| Filter | emailaddress IS NOT NULL | Only use records that have an email address |
| Filter | industrycode IN (1, 2, 3) | Only use records with one of the listed industry codes. Note that option values use the underlying numeric values rather than text |
| Filter | donotsendmm = 0 | Only use records where marketing contact is allowed. Note that true/false values can be compared to 0/1 or true/false. |
Related Records
When you merge records, related records are automatically updated to refer to the new master record. For example, when you merge two accounts, all the related contacts will be moved to the master account.
For tables that natively support merging (Accounts, Contacts, Leads and Cases), this behaviour is controlled by the “Cascade Merge” setting on the relationships. For all other tables, duplicare will move records related via all 1:N or N:N relationships except where the associated lookup field is not updateable.
Technical Details
If you create a Merge+ Rule for an table that does not natively support merging (anything other than Accounts, Contacts, Leads and Cases), a new column “Merged Into” (logical name data8_masterid) will be created along with a relationship data8_masterid_entityname to relate a merged row to its master.
The ribbon for the selected table will be customized to add our own merge-related buttons. This will also hide the default Merge button if the table is one of Accounts, Contacts, Leads or Cases. These ribbon changes will be made in a new unmanaged solution called “DeDupePlus Customizations”.
The new column and the ribbon changes are automatically undone when the Merge+ Rule is deactivated or deleted.
Enable QuickMerge
Access to the QuickMerge functionality is controlled by read access to a configuration table – because of this all system administrators by default will have access to QuickMerge but non-system administrators will not.
In order to give Quick Merge permissions to a user, they will need the “data8 duplicare™ Quick Merge” security role. Once applied, QuickMerge will become available on the ribbon.