Home » Resources » How-to Guides » Salesforce Installation Guide » Email and Phone Validation How-to
Email and Phone Validation Integration
Use our email and phone validation integration to perform email or telephone validation, or check telephone numbers against the TPS on many records at once.
With email and phone validation, you can start a email and phone job to perform email or telephone validation on a specific object’s active records using the mappings you have configured on the settings page. Data8 will extract the relevant data, process it and then push it back into your environment.
Please note that you will need credits on your account for the service you are trying to use. You will also need to create a server-side API key (API key without any authorised domains).
Setting up the fields and results
Before we can run any email and phone jobs and store the validity of the data, the Salesforce environment needs to know where to look for the original data and where to store the result.
Within the “Data8 Data Enhancement App” across the top navigation bar select the option for “Data Settings”.
Once in this page, scroll down until you see the section you want to set up (either “Use Email Validation” or “Use Phone Validation”).
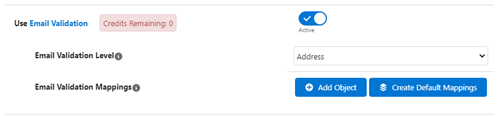
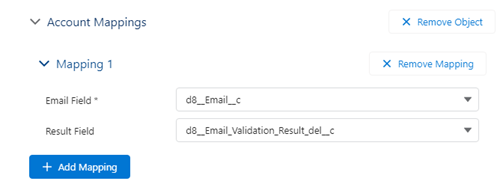
Firstly, you need to select the object you want to set up, which you can do by selecting “Add Object”. Once you select your object, it will appear with a “Mapping 1” option that you will need to expand.
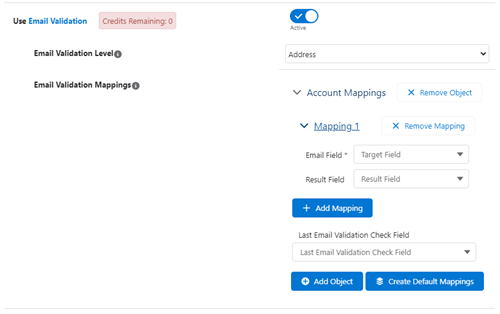
Please select the relevant fields from “Email Field” and “Result Field” – the email field needs to be a field of “Email” and the Result Field needs to be a picklist of “Email Validation Status”,
NB for phone it should be a “Phone” field and a “Phone Validation Status” respectively.
Once you have selected your values, you can either add additional mappings or click save at the bottom of the page.
Creating a Email and Phone job
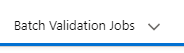
In the “Data8 Data Enhancement App” across the top navigation, select “Batch Validation Jobs”.
Jobs are performed through objects and creation of a new record will create a job that will run behind the scenes of your environment to minimize any disruption.
Each email and phone job has two stages –
- The first stage will perform an analysis and a count to let you know how many records will be checked and how many credits will be charged.
- The second stage (which requires manual approval after the first stage) will actually perform the validation and update the respective fields. Should you choose to bypass the count step, the job will automatically move to the second stage without needing manual approval.
Start by creating a new job and picking which type you’d like to do
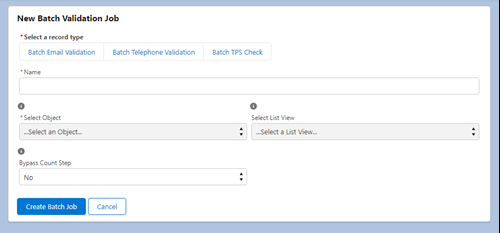
You will need to give the job the following:
- Name – this is only for your reference only.
- Object – this is the object the job will run on (e.g. contact)
You may also choose to run the job over a particular list view for the object, although this is not required and the default will run over all records.
Finally, you can choose whether or not to bypass the audit stage of the email and phone job. If chosen, the job will skip the record count and go straight to validation, incurring an instant credit charge.
From here you can save the record and you’ll be given a basic job with a status of “New”. This means our system has not yet picked up the job – this can take a few minutes. Please take note of the “Message” field which will help guide you through what exactly is happening.
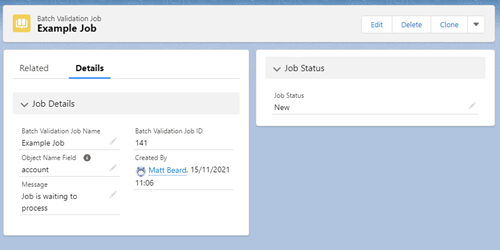
After a few minutes, “New” will become “Counting” which shows we are processing it correctly.
Again, after a few minutes (depending on your volume of data), the job status will change to “Awaiting Approval.” You will also see some top level statistics that will show you how many credits you need to run this job.
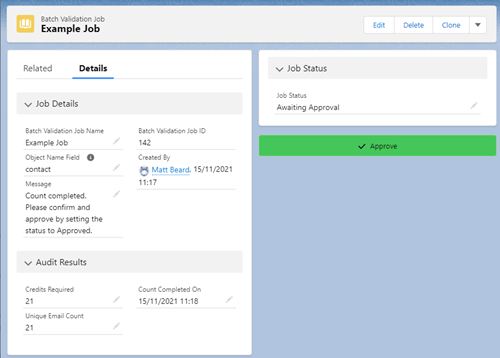
Once you are happy with the credits required count, click the “Approve” button to trigger the second part of the email and phone validation.
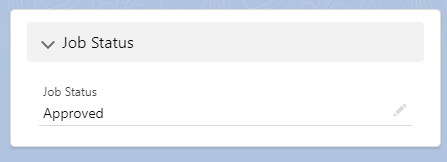
Your status will now be “Approved” and will again wait for Data8 to pick up your request.
After a few minutes, your “Message” will let you know the validation checks are happening. As with earlier, depending on your volume of data, this could take some time.
Once your job is completed, the record will update for a final time and give you top statistics on the quality of your data.
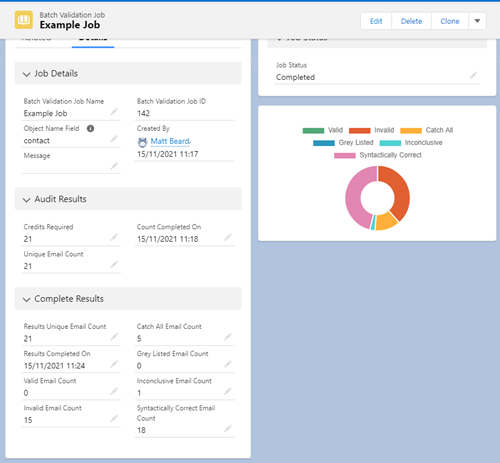
Once you see this screen with all the statistics, this also means the “Result Field” of all records has been updated accordingly.

Creating a Email and Phone Validation Schedule
If you are looking to run the same job regularly, you can create a schedule to do this automatically. Like jobs, email and phone schedules are managed through objects and the creation of a new record will create a new schedule. Likewise, deleting or updating that record will delete or update the schedule.
Schedules will run in the background and will automatically create new job objects with the parameters you set, from there, the jobs will run as normal.
To create a new schedule, select “Email and Phone Validation Job Schedules” from the navigation bar in the “Data8 Data Enhancement App” and create a new record like you would with any Salesforce object.
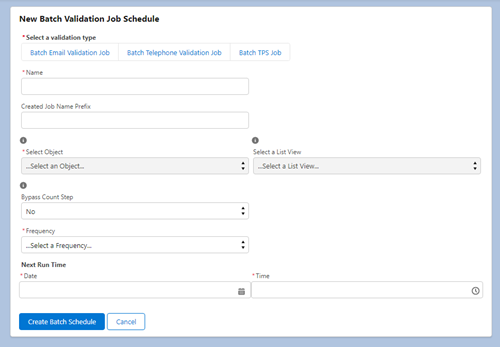
After selecting the type of job you want the schedule to create, you will need to give the job the following:
- Name – this is a name for the schedule and is for your reference only
- Object – this will be the object the created job will run on
- Frequency – how often the schedule will create new jobs
- Next Run Time – when the first job will run, this will be updated as new jobs are created to reflect the next time a job will be run.
You will also have the option of choosing a “Created Job Name Prefix”, this will apply to all jobs created by this schedule, giving them all the same name prefix and is for your reference only. As with creating a job, you can also select a particular list view to run the job on and you may choose to bypass the count step on all jobs created by this schedule – this will mean the jobs don’t need manual approval but it will result in an instant credit charge for each job created.