Home » Resources » How-to Guides » Salesforce Installation Guide » Flow Integration with External Services
Flow Integration with External Services
Implement any of Data8’s APIs in Salesforce through the External Services feature, and use them in Flows.
Swagger files are available for each of our services which are used to generate an External Service within Salesforce. This service can then be called from a Screen Flow, through the actions node.
Please note that you will need credits on your account for the service you are trying to use. You will also need to create a server-side API key (API key without any authorised domains).
We are currently working on generating individual swagger files for every service. In the mean time, we do have some swagger files available to use which group some of our services together:
Here’s an example flow for the bank validation service, using the external service generated from the validation services swagger file.
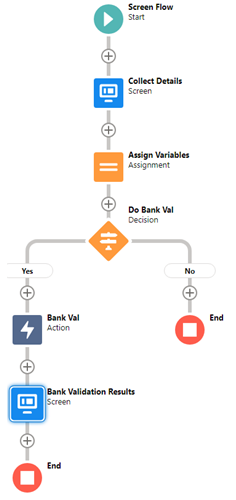
Lets look at how the main components of this flow were created.
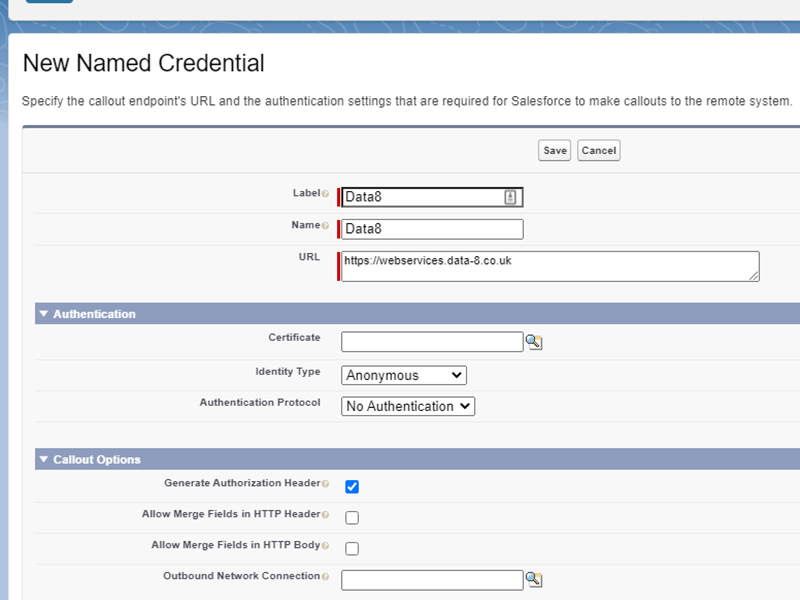
Step 1: Named Credentials
- Go to Setup.
- Search for Named Credentials.
- Create a new named credential.
- Give it a useful name to identify it in the future, such as ‘Data8’.
- Enter the url ‘https://webservices.data-8.co.uk’.
- Leave Certificate blank.
- Select Anonymous for the Identity Type.
- Leave all other settings as they are and click Save.
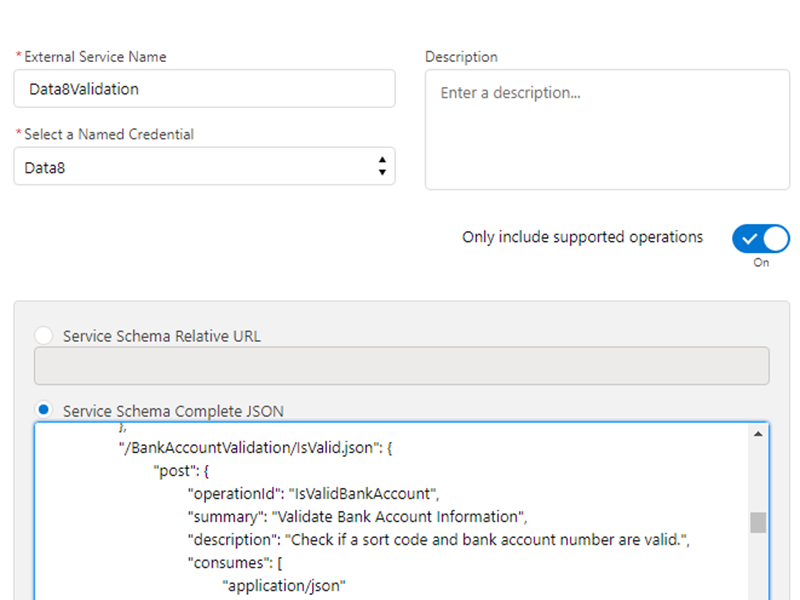
Step 2: Create an External Service
- Go to Setup.
- Search for ‘External Services’.
- Create a new External Service.
- Enter a useful name in the ‘External Service Name’ box, e.g. “Data8Validation”.
- In the ‘Select a Named Credential’ box, select the Named Credential you created in step 1.
- Select ‘Service Schema Complete JSON’.
- Copy and paste the relevant schema into the textbox.
- Click ‘Save & Next’ and then click ‘Done’.
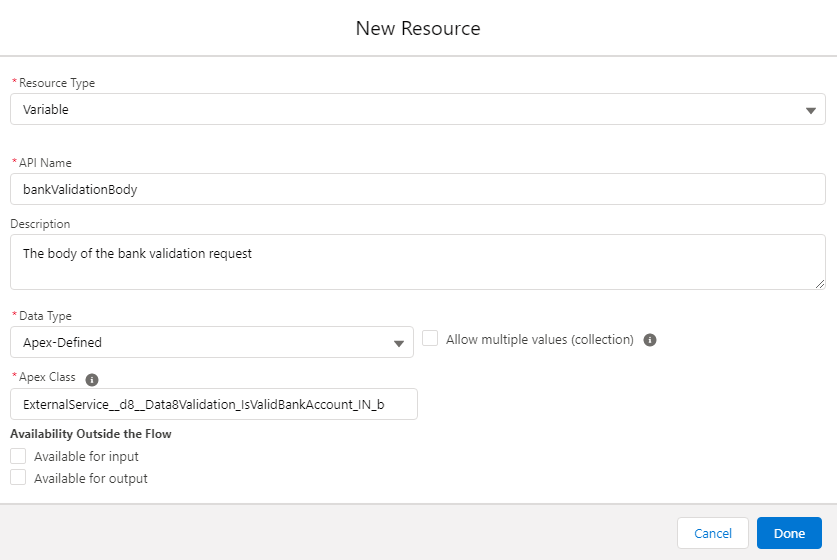
Step 3: Creating the Flow – Initial Setup
Using the Bank Validation service as an example:
- Go to Setup.
- Search for ‘Flows’.
- Create a new Screen Flow.
- Create any necessary steps/screens to collect data such as bank account details from the user.
- Create a new variable which will be the body of our request.
- Give it a useful API name such as ‘bankValidationBody’.
- For the data type, select ‘Apex-Defined’.
- For Apex Class, select the ‘IN_body’ option for your desired service, i.e. ‘ExternalService__Data8Validation_isValidBankAccount_IN_body’.
- Click ‘Done’.
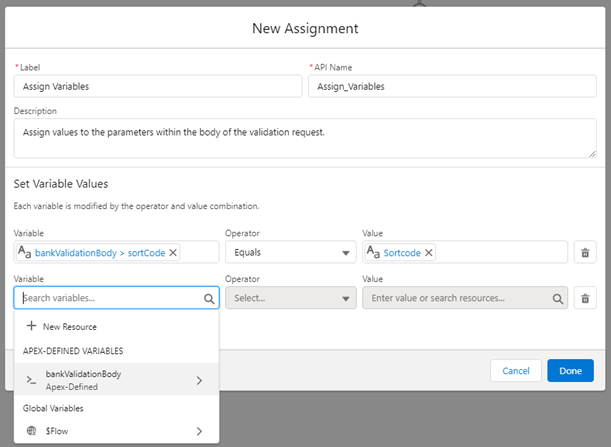
Step 4: Creating the Flow – Variable Assignment
Create an Assignment element and assign the appropriate values into the body variable.
- The parameters required in the body of the request will vary depending on the service you are integrating. For bank validation, we need to provide at least a sortcode, and optionally a bank account number too.
- To do this, click within the Variable box, and under the Apex-Defined variables section, select the body variable you created earlier. You will now see the parameters available within the request body along with the options object which can for the most part be left as its default values. In this example, the bank validation service takes two parameters: Sortcode (‘{!bankValidationBody.sortCode}’) and Account Number (‘{!bankValidationBody.bankAccountNumber}’). However, only the sortcode is required.
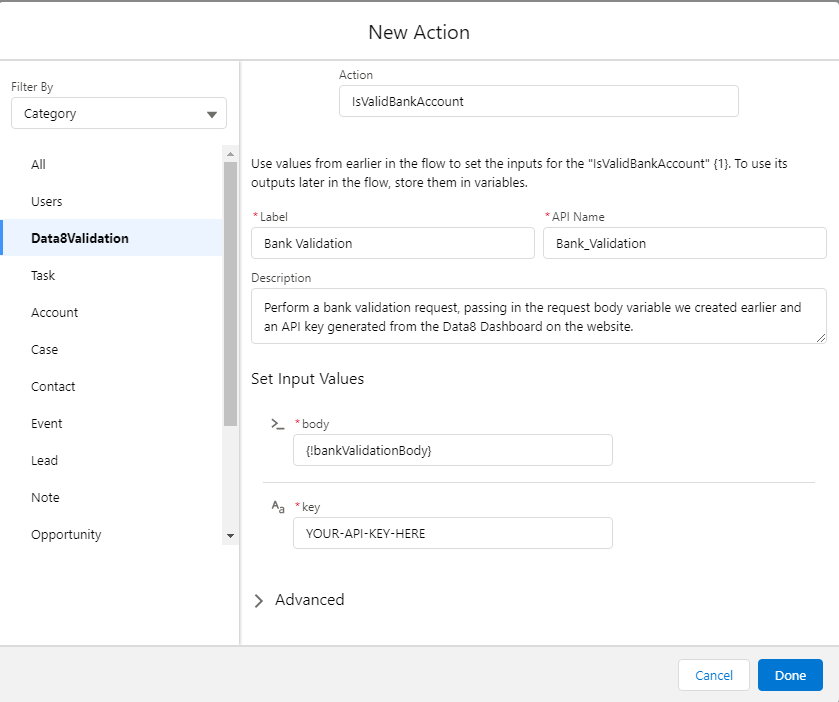
Step 5: Creating the Flow – External Services Action
Create an Action element for the Data8 External Service.
- Select the Data8Validation External Service.
- Within this, select the appropiate validation method to use: i.e. isValidBankAccount.
- Set the body parameter to the body variable you created earlier.
- Enter your server-side API key into the API Key box. You can generate an API key from the Data8 Dashboard, under the Validation tab.
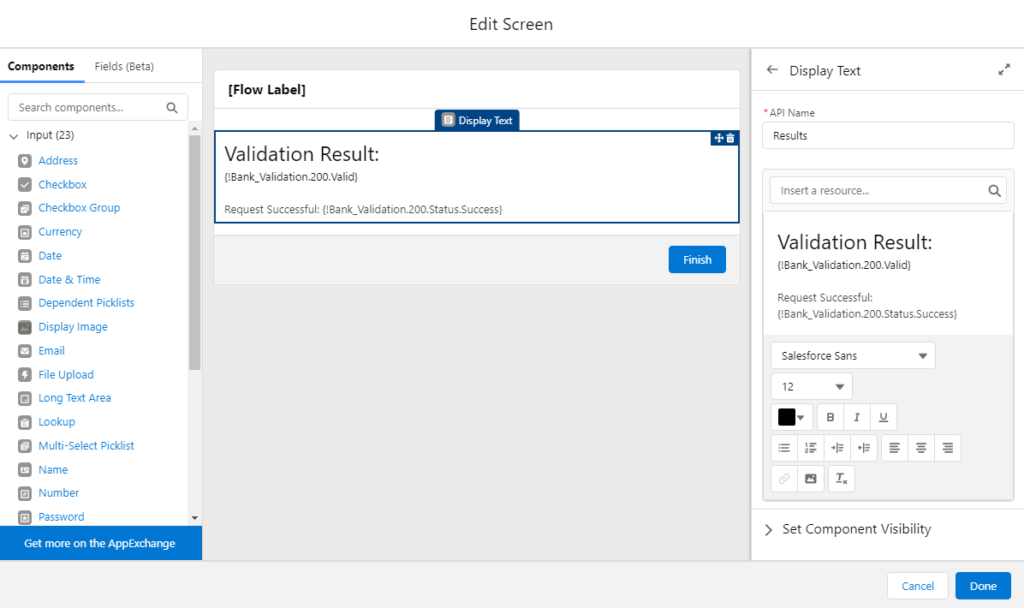
Step 6: Creating the Flow – Response Handling
Make use of the response variables within a screen or other flow element to update records or feedback to the user.
- The result will be stored within the 200 object of the response.
- For each service, the structure of the response is slightly different. See the API documentation for an example response structure.
- To get the bank validation result, we can use {!Bank_Val.200.Valid}.
That’s it! Save and Run the flow to test it. See the relevant page under Products on the website for validation examples to try.