Home » Resources » How-to Guides » Salesforce Installation Guide » Record Form Override
Record Form Override
This page will demonstrate how to override the default record form to get real-time email, phone, bank account and name validation, PredictiveAddress, telephone formatting and TPS/CTPS checking on your records.
The process of setting up an override needs to be completed for each object that you want to apply one of the Data8 services to (unless you are using the other method of applying validation). For example, you may decide to complete this process for the Account, Contact and Lead objects.
The Steps
1. Go to ‘Setup’ > ‘Objects and Fields’ > ‘Object Manager’.
1. Click the object you want to apply Data8 validation to (i.e. Account/Contact/Lead).
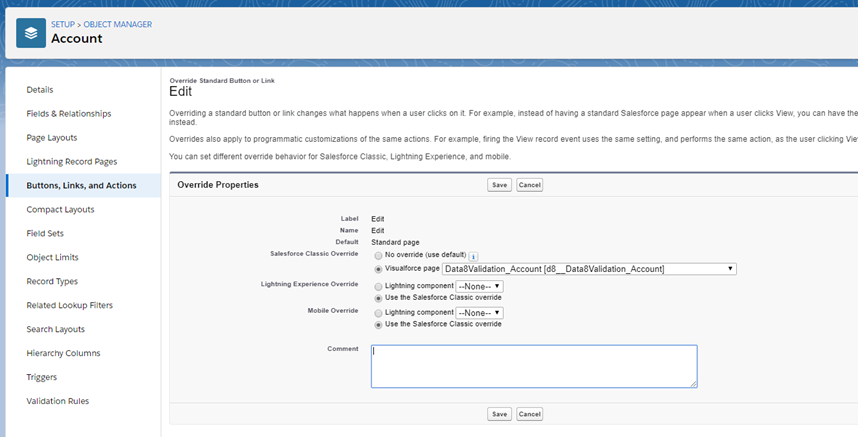
1. Go to ‘Buttons, Links, and Actions’.
1. Find the ‘Edit’ button > click the drop-down arrow (on the RHS) > click ‘Edit’.
1. In ‘Salesforce Classic Override’ section, select the ‘Visualforce page’ radio option > in the drop down select the appropriate Visualforce page for the object you are overriding (i.e. Data8Validation_Account).
These have been set up for you for the Account, Contact and Lead objects, and named accordingly ‘Data8Validation_[object]’.
If you wish to use the Record Form Override method on an object that isn’t Account, Contact or Lead, you will need to create a Visualforce page, and copy the code from the ‘Data8Validation_Account.vfp’ page, changing references to ‘Account’ to your object name (3 places it needs changing).
Ensure the ‘Lightning Experience Override’ and ‘Mobile Override’ options are set to ‘Use the Salesforce Classic override’.
6. Repeat steps 3, 4 and 5 on the ‘New’ button to ensure validation will be applied when creating and editing records.
Data8 Validation will be applied to the forms, based on the global configuration options you have set in the Data8 Settings page.
Record Details Displaying Cached Data
There is an issue with data caching on record details pages that can prevent the latest updates from being shown right away. If you experience these issues yourself, follow the steps below to force the page to get the latest data, every time.
- Go to the record details page that you are noticing delayed updates on (only have to do this once per object).
- Click the cog in the top right corner and go to ‘Edit Page’.
- Drag and drop the Visualforce page component onto the page layout and then enter ‘Data8_Validation_CacheFix’ as the name.
- Save and activate the page as an org default.
This Visualforce page is a hidden component which forces the view to load the latest data rather than using a cached source.