Home » Resources » How-to Guides » Salesforce Installation Guide » TPS Configuration
TPS Configuration
Our TPS checking service can be integrated in three ways, through the Record Form Override method (recommended), through a lightning component which can be added to a lightning record page, or via triggers. Before completing one of the below TPS configuration processes on your desired object, fields will need to be created for each telephone field to store the result of the TPS check.
Creating necessary fields:
- Go to ‘Setup’ > ‘Objects and Fields’ > ‘Object Manager’ and click on the object you want to add TPS to.
- Click on ‘Fields & Relationships’ and create a ‘New’ field:
– Data Type = Picklist
– Global Value Set = TPS Status
– Label = e.g. ‘Phone: TPS’
– Name = e.g. ‘Phone_TPS’ - Click ‘Save’ and repeat for each telephone field you wish to perform TPS checks on.
- You may also wish to create a custom Date field to store the date/time that the last TPS check was performed on all the suitable fields.
Having created the custom result fields, mappings for the TPS service can now be configured on the Data8 settings page.
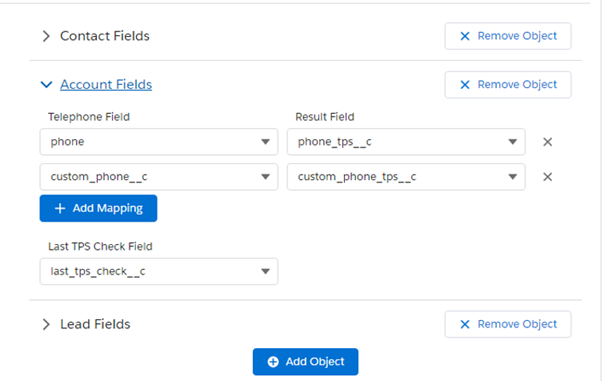
The output of the TPS checks can be displayed nicely through our ‘TPS Status’ Visualforce page that can be added to the object Page Layout (recommended height: 60px). The result will also be stored in the custom field we will create, should you want an alternative view of the results.
Configuring Page Layout:
- Go to ‘Setup’ > ‘Objects & Fields’ > ‘Object Manager’. and click on the object you wish to integrate TPS with.
- Go to ‘Page Layouts’ and edit the page layout.
- Drag the ‘TPSStatus’ Visualforce page onto your page layout.
- Make sure your custom result fields (e.g. ‘Phone: TPS’) are on the page layout.
- Save the layout.
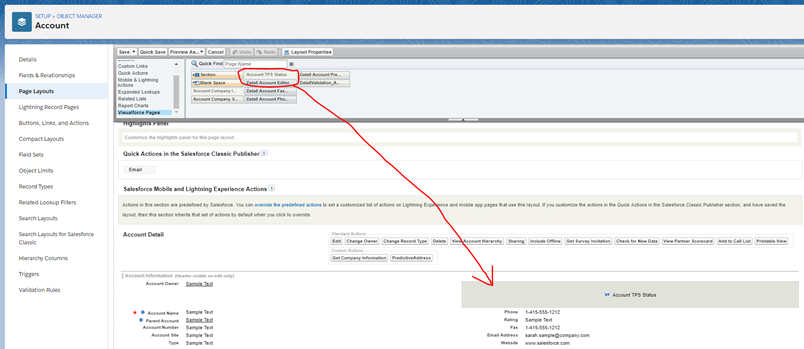
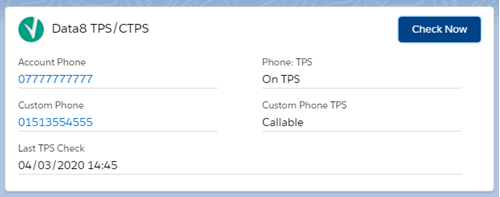
You should now see the TPS results displayed on the record details page. This value will be updated after editing or creating a record. The colour of the icon indicates the TPS status of the number. Hovering over the icon will also provide feedback on the status.
Record Form Override Implementation
Having performed the above steps, you can now complete the Record Form Override method to get TPS checking in real-time whenever data is entered into your system. This can be used alongside the lightning component.
Lightning Record Page Integration
- Navigate to a record of the object you wish to integrate with (i.e. a record on the Account object), and click ‘Edit Page’ from the cog in the top right corner.
- Drag the ‘Data8TPS’ lightning component onto the page layout.

3. Save the lightning page (and activate as org default).
The TPS component should now appear when previewing a record.
Using Triggers Instead of Record Form Overrides
If you do not wish to use the Record Form Override method, or the lightning component, triggers can be created and used to perform TPS checks. See the section at the bottom for information on how to achieve this.
This method can be used to perform TPS checks on the Account, Contact and Lead objects without overriding the default record form, although the fields to check will be hardcoded to the standard telephone field and will not make use of the mappings set up in the Data8 Settings page.
Simply enable the triggers on the settings page, and add the TPS status component to your object’s page layout (You will need to set up the mappings in the Data8 settings page for the TPS status component to correctly display the results).
For information or help on using these triggers, please email [email protected]. The team will be happy to help