Skip to the content

C# Implementation of a Web Service

Every day is a learning day in data and web development. The following blog is from Ryan who recently joined the data8 team. His enthusiasm for the role comes through and willingness to learn as well!

Ryan Lewis

"...The aim of this post is to show my journey step-by-step, from learning the basics of web development, right through to creating a working web application with an email validation check.

I began working at Data-8 at the start of January and coming from a Game Development background I had no real experience developing in MVC or developing web applications. I quickly felt like I would be out of my depth, but within a week of being at the company, I was introduced to one of our webservices, ‘Email Validation’, and was tasked with implementing it into my first web form application.

The web form application would be for a library book request system, where users would leave a name and email address as they add themselves to a waiting list for the book they specify. In a real system, the validity of the email address would be important to ensure that the user could be contacted when the book is ready.

*Looking back, this was a very enjoyable first project and I picked it up easily which gave me a huge boost in confidence. I’d also like to point out that Telerik Fiddler was a very useful tool whilst trying to implement the webservice, as it allowed me to get a better understanding of what was happening behind the scenes. *

The first step towards creating a web application to implement a web service through C# and MVC, was to create an ASP.NET Web Application project in Visual Studio.

Creating A Controller for The Home Page Including Actions

Next, I needed to create a controller to link a model (like a class for data) to a view (user interface) and process the inputs from the view.

To create a controller, I right clicked on the controllers’ folder in the solution explorer > add controller (I named it Home Controller)

Creating A Service Reference for the Email Validation Web Service

Next, I discovered that I needed to create a service reference for the web service that I wanted to implement. This would allow my code to access the API and use the functionality of the service (at the time it was just something I had to do to get it to work).

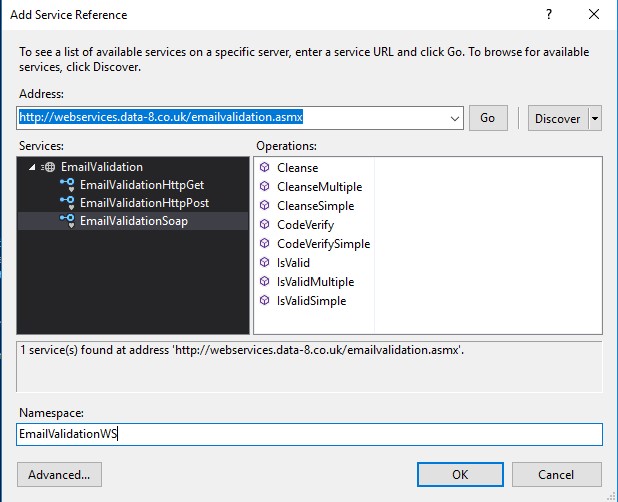
In solution explorer, I right clicked on References > Add Service Reference > and in the Address box added the link to the web service (e.g. http://webservices.data-8.co.uk/emailvalidation.asmx)

I clicked Go > Selected the drop-down icon next to the service in the services box > Selected the option with -Soap at the end > and saw a list of available operations reassuring me that I’d done it correctly.

I named the service reference something appropriate (‘EmailValidationWS’) and clicked ‘OK’.

The next step was to add some code to my controller to make it come to life. I began by creating ‘ActionResult’ functions for each view, which could return the model data to a view for the user to see. I also created an overloaded function for my main view (‘RequestABook’). The overloaded function took a model (that I would later create) as a parameter, and then used the data from the model to validate the email address.

I created a reference to the email web service soap (Simple Object Access Protocol), and then used that reference to call a function on the web services API. In this instance I called the ‘IsValid’ function, which took a username, password, email address to validate, validation level enum and any extra options. The function returned a bunch of data, but the bit I was interested in was the Result object, which would inform me if the email address was Valid or Invalid.

I did a quick check on the validity of the email address, and if it was invalid then I outputted an error message through the ‘ModelState’. Otherwise, it would take the user to a view called ‘ThankYou’.

I also had to include “using Wiki_Back_End.Models” for visual studio to recognise the ‘RequestABook’ model as a parameter.

Creating A Model with the Required Fields and Adding Some Basic Validation

Next, I needed to create a model that would control the entered data from the view. I also found that I could add some simple validation to require fields to be filled in, or else produce an error message.

I right clicked on the models’ folder in the solution explorer and added a new class called RequestABook (from my parameter earlier). I created several fields such as ‘BookName’, ‘Email’ and ‘ContactName’ each with get and set functions. I also gave each field a display name and made them required, with a custom error message for each should they be left blank.

Add validations to the model:

I had to include “using System.Web.Mvc;”, “using System.ComponentModel;” and “using System.ComponentModel.DataAnnotations;” to get the class to be recognised as a model in MVC.

Creating A View for ‘Index’, ‘RequestABook’ and ‘ThankYou’

In the Home Controller, I right clicked on the Index method > Add View > Add

I then right clicked on the ‘RequestABook’ method > Add View > Changed Template to ‘Empty’ > Changed Model Class to ‘RequestABook’ > Add

This basically told the view to inherit from the model ‘RequestABook’, to get access to its variables such as ‘BookName’, ‘Email’ and ‘ContactName’.

Finally, I right clicked on the ‘ThankYou’ method > Add View > Add

Add HTML Code to ‘RequestABook’ View to Create Fields for User Input

The next step to creating my web application was adding HTML code to create fields for user input for the required data in the model.

To aid with creating the fields for the model, I used HTML helpers and the Razor view engine, such as “Html.BeginForm()”, “Html.LabelFor()” and “Html.EditorFor()”.

I also used Razor to enable ‘ValidationSummary’, which generated a list of the validation messages that I created earlier when creating the model.

Each field had its own label (“Html.LabelFor()”), its own text box element (“Html.EditorFor()”) and a “Html.ValidationMessageFor()”, which was where the validation message would be displayed if necessary.

I also created a submit button to submit the form and if valid from the model’s basic validation, send the entered data to the overloaded ‘call back’ function I created earlier in the controller.

Set the Start Page to Load the Correct View

When running the project, I found that it was loading the index view on default, and I wanted my main landing page to be the ‘RequestABook’ view, so I went into the ‘RouteConfig’ settings and changed the default action.

In the solution explorer, I opened the ‘App_Start’ folder > RouteConfig

On the defaults’ parameter of ‘MapRoute’, I changed the action value to RequestABook

Removing Duplicate Code in ‘Web.config’

For some reason, after adding a webservice as a service reference, an extra copy of code was created in the ‘Web.config’ file. I had to manually go into the ‘Web.config’ file and remove the duplicated code to keep the project clean (I later discovered that I could have just defined the name of the endpoint as a string when I set up the ‘emailvalidationsoapclient’, but I would the duplicate code would still have been there!).

In the solution explorer, I clicked on ‘Web.config’.

I scrolled down and found the custom binding tag which has a 12 appended at the end of the service name in the binding name, and deleted it as below:

I also deleted the endpoint tag with a 12 appended at the end of the name.

Testing the Web Application

And that was everything. When I ran the project now, it loaded a page with the various fields declared in the model on it, and a submit button at the bottom. The required field validation worked on empty fields, and the email validation check worked.

This project was a great learning curve for me, and although I was overwhelmed at the start, it was actually a pretty straightforward process. With a lot of ‘googling’ and research to make up for my lack of experience in web development, I managed to create my first web application and implement a validation web service from Data-8.

Next Steps

Find out more about how Data8 can help you

About the author

Ryan Lewis

Ryan Lewis