Creating a Dedupe+ Rule
data8 duplicare™ enhances the standard duplicate detection rules with its own Dedupe+ Rules. Navigate to Dedupe+ Rules on the main sitemap and click the “New” button to create a new rule.
Give the rule a name to help you identify it and enter your base & matching record types. This works in the same way as the standard duplicate detection rules – the base type defines the table that will be matched from, and the matching type defines the table that will be found. These should be entered as the internal “logical” names of the table types, e.g. “account” or “contact”.
Real Time Enabled
The “Real Time Enabled” option defines whether this rule should be applied to identify duplicates as a user is entering a row (if set to “Yes”), or only to identify duplicates within your database in bulk (if set to “No”).
Global Search Enabled
The “Global Search Enabled” option allows you to determine if the rule is going to be used anywhere you use a global search. Configuration of global search is mentioned in a later section of this configuration guide.
Records to Search
By default, duplicare will only return potential duplicates that the initiating user is able to see based on your existing security roles. By toggling this, you can allow duplicare to search across all rows in the system. If a duplicate is found in this way and the initiating user should not be able to view the potential duplicate row, they will not be shown the row but will be told a matching row exists. At no time will we overrule your existing security and reveal data that a user is not able to see.

Once you are happy with your selections, save the row. At this point, the solution will make various required customizations to your system to support the duplicate detection system so this can take a little while to complete. Once it has finished saving, the option to define the details of the rules will appear.
Setting up the details of the Dedupe+ Rule
Click the drop-down list to select a rule to add. The following types of rule are available:
Groups other rules together. A default “And” grouping is applied automatically to the rules you add. You can switch an “And” to an “Or” by clicking the ellipsis to the right.

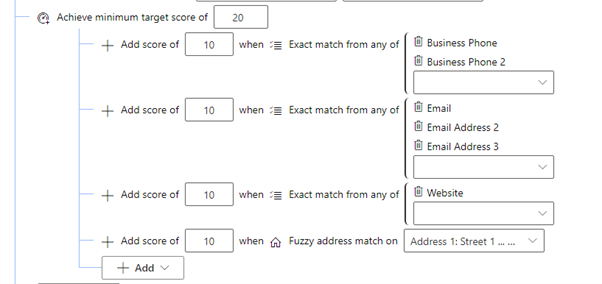
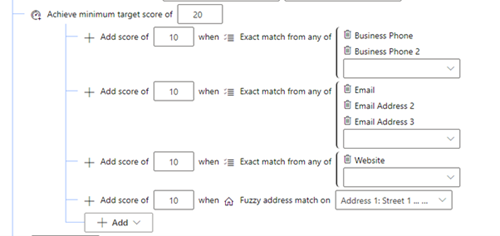
Groups other rules together and assign each rule a score, either positive or negative alongside a minimum threshold to make the score pass.
Provides simple matching of exact columns, like the standard duplicate detection rules. Select the column to match.

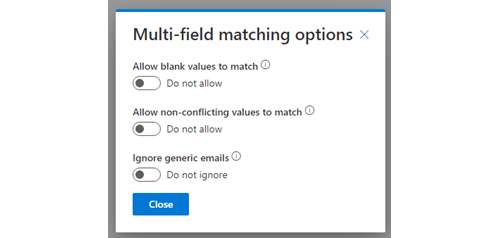
Additional options are available by clicking the ellipsis to the right and selecting “Fuzziness Options” – note the options you see may not all be visible based on the data type you are generating the rule on:
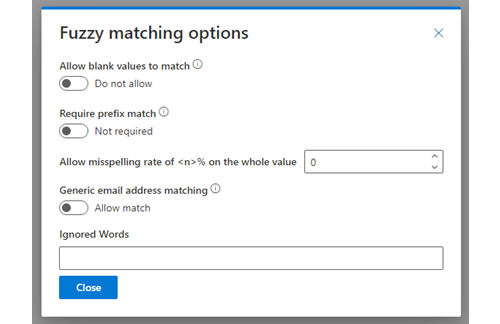
Allow blank values to match:
This will allow a blank value to match another blank value. This does not allow a populated value to match a blank – that is covered by the “Non-Conflicting” rule type below.
Require an exact match on the first x characters:
This will apply the exact match only to the starting characters of the column.
Allow a misspelling rate of…:
You can specify a misspelling rate to allow fuzzy matches in case of mis-typed values. This is expressed as a percentage value which represents the number of characters the two values are different by. If the value on your master row is 10 characters long and you specify a misspelling rate of 20%, this will match rows with values up to 2 characters different.
Ignore Generic Matches on emails:
When used on an email column, this will look for the value on the left hand side of the @ symbol and will exclude it if we deem it to be a generic value such as (but not limited to) sales@, marketing@, info@.
Ignored Words:
Each word entered onto it’s own line will be removed entirely from the value. For example if you had “test” in this box then “Data8 test duplicare” and “Data8 duplicare” would classify as an exact match.
Provides matching of exact values across a set of columns. Use this to allow matching of any telephone number or email address for example. In the drop-down list, select each column you want to include in the match in turn to build up the list of columns.

A row will count as a match if any of the columns match, e.g. the Business Phone from one row matches the Home Phone of another.
Additional options are available by clicking the ellipsis to the right and selecting “Fuzziness Options”:
Allow all blank values to match:
This will enable rows where all the column values listed are blank to match another row where all the column values listed are blank.
Allow a blank value record to match a record with values:
This behaves the same as the later defined “Non Conflict” rule but across multiple columns. A row with populated column values will match a row with all blank column values but will not match a row with different populated column values.
Ignore generic matches:
When used on a email columns, this will look for the value on the left hand side of the @ symbol and will exclude it if we deem it to be a generic value such as (but not limited to) sales@, marketing@, info@.
Provides specialized fuzzy matching for company names, considering the various ways of writing what appear to a human to be the same. For example, this would allow “Data8 Ltd”, “Data 8 Limited”, “Data Eight Group” to match.

Options to control the details of what matches will be allowed can be found by clicking the ellipsis to the right and selecting “Fuzziness Options”:
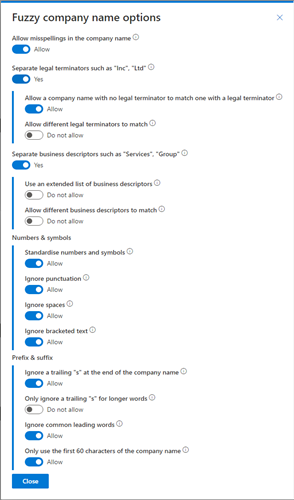
Using this rule will create a standardized company name column automatically which may take a short while to initialize so by amending this rule, you may not see the results reflected immediately.
Provides specialized fuzzy matching for addresses, taking into account the various different ways of writing an address that can all relate to the same location.
Before being able to select an address to match, you must first configure the set of columns to be used for the address under the Settings > Address Fields section.

Options to control the details of what matches will be allowed can be found by clicking the ellipsis to the right and selecting “Fuzziness Options”:
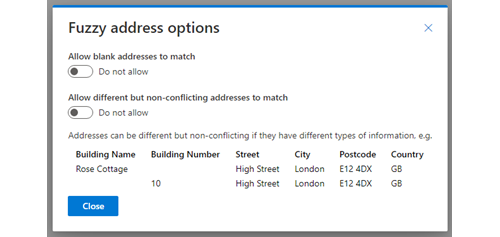
Allow all blank values to match:
This will enable rows where all the address is blank to match another row where the address is blank.
Allow a blank value record to match a record with values:
This behaves the same as the later defined “Non Conflict” rule. A row with populated address will match a row with a blank address but will not match a row with a different address.
Provides specialized fuzzy matching for person names, considering nicknames as well as misspellings. Select the columns that hold the first and last names as well as optionally specifying a title field. The title field isn’t required but will assist in making stronger matches.

Options to control the details of what matches will be allowed can be found by clicking the ellipsis to the right and selecting “Fuzziness Options”: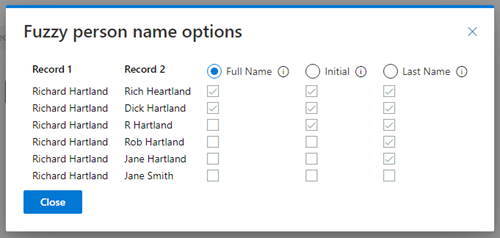
Restricts the matching to a specific subset of rows, independent of the row being created/updated. Commonly used to match only active rows by selecting the status column but can also be used to apply different rules to different types of rows, e.g. tighter matches on customers
vs. prospects

Similar to the Exact Match rule but allows any value to match a blank. Commonly used for columns that provide a link to an external system where merging two rows with different values would cause an error while still allowing manually entered rows to be matched.

Introduced later into the platform, a multi select picklist allows multiple options to be chosen from an option set. When using this rule, a single common selection between these multi selects will be enough to produce a duplicate match.

Domain match allows multiple columns to be selected and the domain will be extracted out to perform a match. For example, email addresses such as helpdesk@data-8.co.uk would match website urls of https://www.data-8.co.uk.
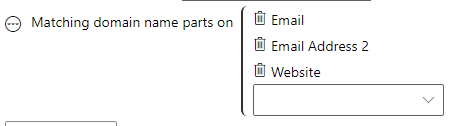
Options to control the details of what matches will be allowed can be found by clicking the ellipsis to the right and selecting “Fuzziness Options”: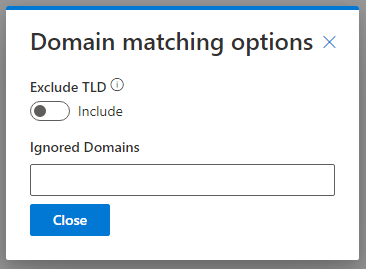
Exclude TLD:
Any match will exclude the top level domain in a match so https://www.data-8.com would match mattb@data-8.co.uk.
Excluded Domains:
Any domains that you do not wish to be included in the search – for example you may decide to not do a search on any row with an @gmail.com email address or a website of https://www.gmail.com.
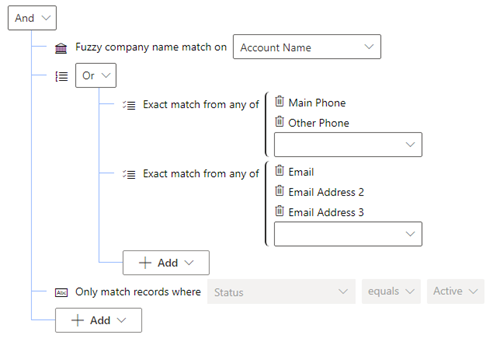
As an example, we can combine these rules to find matches between active contacts in the same account where there is either a match on the name or telephone numbers as shown below:
Viewing the duplicates with out of the box window
When you created the Dedupe+ Rule, a new column “Duplicate Detected Id” (logical name data8_duplicatedetectedid) is automatically created on the selected table (both base and matching, if different) and a standard duplicate detection rule is created on it. The new column is automatically removed when the Dedupe+ Rule is deleted, assuming no other rules require it.
To make duplicate detection work you will need to complete these changes manually on the forms you want it to work on. Both Main and Quick Create forms can be customized in this way:
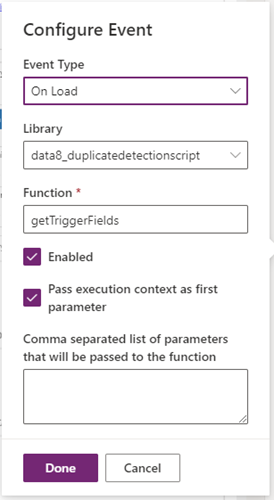
1. Add the “Duplicate Detected Id” column to the form. It can be hidden if required or you can leave it on display and set up the custom control from the next section.
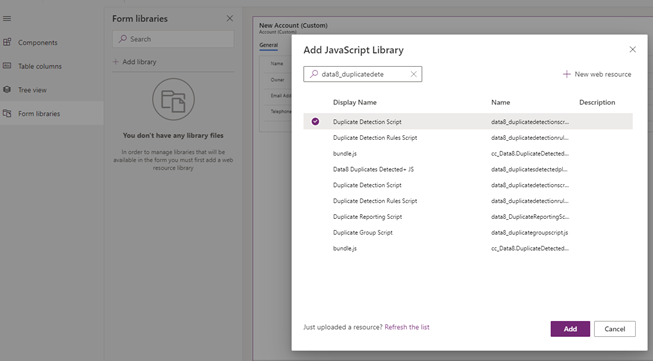
2. Add the data8_duplicatedetectionscript script library to the form

3. Add an event handler to the form OnLoad event. Select the duplicatedetectionscript library, enter getTriggerFields as the function name and enable the option for passing execution context.
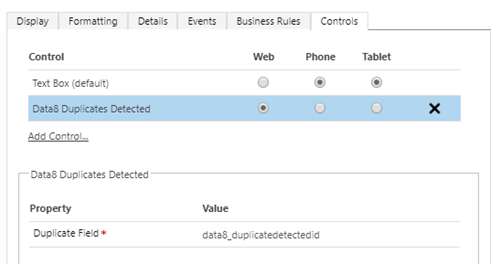
Viewing the duplicates with the custom control - (Online Only)
Using the classic form editor, you can assign custom controls to any column – within the duplicare solution is a Data8 Duplicates Detected custom control which can be used on the data8_duplicatedetectedid column to quickly show duplicates.
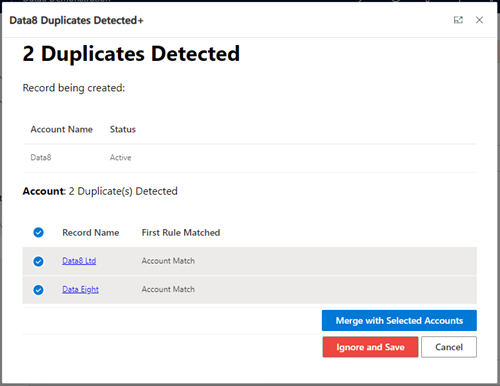
Viewing the duplicates with Duplicates Detected+
- (Online Only)
Introduced in Wave 1 2021 was a “Merge” button on the out of the box duplicates detected window. This clashes with some of the core functionality and to counter this, we recommend you enable “Duplicates Detected+” option from the main authentication page.
By enabling the “Duplicates Detected+” option, the out of the box “Duplicates Detected” will be replaced by a duplicare equivalent which, as well as the columns, will show the name of the dedupe+ rule which was satisfied and found the duplicate.