Lookup+ is a feature designed to make finding the correct row for a lookup even easier by leveraging the full power of the deduplication logic on data8 duplicare.
Lookup+ allows you to create a bespoke deduplication rule for each lookup, enabling you to quickly find the row you want. If you do not want to use a bespoke deduplication rule but would still like to use Lookup+, it will default to the global search behaviour.
Creating Rules for Lookup+
Lookup+ does not require anything specific on the dedupe+ rule which enables you to make as many rules as you want. The rule does not need to be real time enabled, nor does it need to be global search enabled so you can leave those options off if you wish.
This page will use a similar example throughout - setting the parent account of an account. In this example, we have a column on account that states "Company" or "Site" and the parent account of a "Site" account can only be a "Company" account. This would be difficult to enforce on a standard lookup column.
An example dedupe+ rule has been made like so:
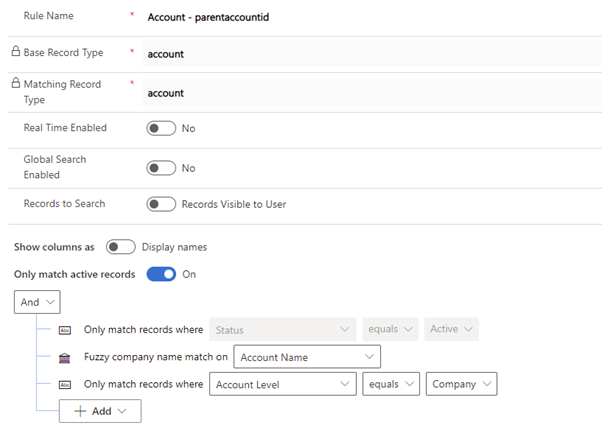
Translated to plain English, this rule set will find any rows that match the inputted account name, whilst ensuring only active "Company" level rows are returned.
Configuring Mappings
Once you have made the rule you wish to use, you need to make the Lookup+ Configuration - this can be found in the "Duplicare Administration" model driven app included in your solution.
Create a new row and set the columns as required:
- Source Entity Logical Name: This is the logical name of the table you are setting a lookup+ for.
- Source Attribute Logical Name: This is the logical name of the lookup column in which you are setting lookup+ for.
- Dedupe+ Rule: This is a lookup to the dedupe+ rule you have made. If none are selected, the search will default to the global search format.
Once you have set those values, save the form which will refresh the configuration form at the bottom. This is configured almost the same as global search - the only difference is how you save the configuration:
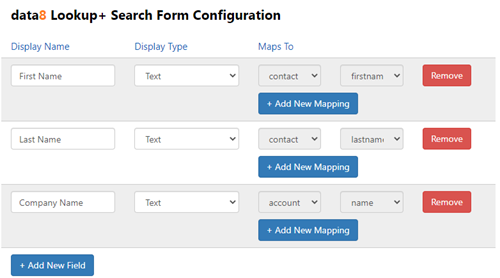
To add a new column entirely, click the “+ Add New Field” button. This will create a new row on your lookup+ form. You can also specify the type of the input – at the time of writing, this will not change any behaviour and is more for reference.
Once you have a column row, you can add a new mapping to that column by clicking “+ Add New Mapping”. Two drop down boxes will appear; one will contain a list of possible tables that have dedupe+ rules configured and one a list of the possible columns that can be mapped – note that changing the table can change the columns you have available as this is a dynamic list of columns. Only columns that do not have a current mapping will be listed – if you wish to re-map a column, you’ll first have to remove the existing mapping.
Lookup+ will not contain a "Save Changes" button and instead, you are required to save the lookup+ row itself.
Configuring your Form
To set up for your form for Lookup+, you simply need to add a Web Resource in the relevant place - ideally directly underneath the lookup column.
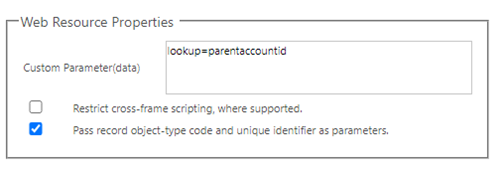
Edit your form, add the "data8_openadvancedlookup.html" web resource onto your form. You can give the web resource any name/label you wish and we recommend settings it to be 1 row high and not displaying a border.
On the general tab, set the properties as following - replacing "parentaccountid" with the lookup column that you are configuring.
Save, publish and close your form editor.
Using Lookup+
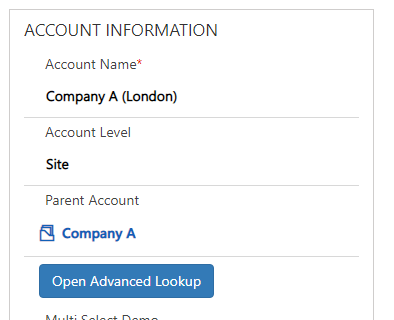
Open an existing row to test out your lookup+ set up. To expand upon the previous example, some sample data has been included as follows:
- "Company" row called "Company A"
- "Site" row called "Company A (London)"
- "Site" row called "Company A (Liverpool)"
We would like to check this works as expected by trying to set the parent account of "Company A (London)" and the only suitable candidate for this is "Company A".
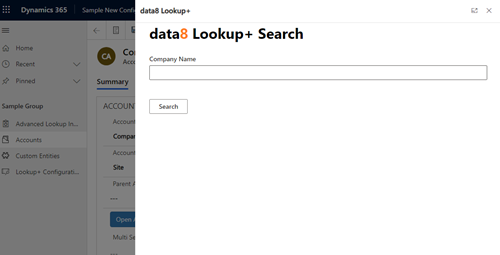
Clicking the web resource should pop up the lookup+ search on the right-hand side of the screen. Input your search (in this case, "Company A") and press "Search".
Allow the search to finish to see your results.
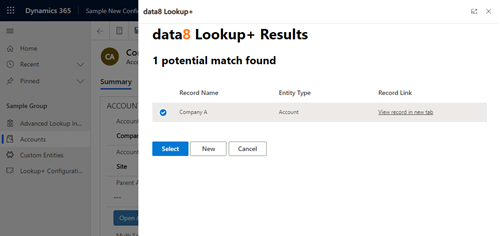
Here you can see we have the expected results - we have correctly stopped the "Company A (Liverpool)" row being listed and we are only seeing correct "Company" level rows. If we select the row and press "Select", the column is populated and the search window closes.